I have been a long time consumer of this site but have not frequently posted. Figured it was about time that I start a thread on my project, FISMA (@$% I Spent Money Again).
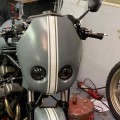
Here are some pictures of where it is at now. Well, mostly. It is actually a lil further along, but I did not snap any new pics of it.


This bike has quite the history on which one day I will take the time to spin that yarn for all of you. But for now, let's stick to the basics.
A Brief History
I bought the bike off of a friend. I had not really ridden before and when I did my research, it seemed like it was a great starter bike. Air Cooled, decent power, and looked pretty cool. It was stock for the most part, however it had been hit in a parking lot so had an aftermarket front fairing. I basically got it off of him for $1000 plus a truck. I joke with him that the bike spent more time in the back of the truck that I sold him then it did on the road for the first year. Yeah, the first 3 months the bike decided to have lots of issues. However, I was able to track them down, solve them, and got a good two years out of the bike before I sold it to another friend who also wanted a good starter bike.
Not sure how long he road it for, but I know it did get knocked over again in a parking lot after which he decided to move on to a different bike. So, it sat for several years getting neglected, as he ended up not getting another bike and thus did not trade in the Seca, nor sell it because it was damaged, and while he had it there was charging issues with the battery. After seeing some of the projects on this site, I decided, "Why the @#$% not!" and bought the bike back from him and decided to make it my project bike. And that has where it has been at for the last 3 years. Yeah, I was bad. But, I used the excuse that I was really trying to research what I wanted to do. Finally, ordered all the parts and started working on it this summer. Still not done with it, but figured I would try to inspire myself to work on it more by posting.
What has been done
97 Rear Plastics – Got all the rears from 3 different 97 bikes to put them on
FZR Front End Swap – Snagged Forks, triple tree, wheel, fender and gauges off a 96 FZR 600
FZR Rear Wheel – Got a rear wheel off a 96 FZR (Different one)
R6s Brakes and Switches – Swapped front brakes to R6s Blue Dot and also upgraded the switches to R6s
FZ-07 Key Set – Got ignition, gas cap, and seat lock off a FZ-07 and swapped them
6Sigma Jet Kit – Swapped the jets (pilots and main) and put spacers on the floats
Complete Carb Rebuild – Including the 6Sigma, also rebuilt all the cards with new gaskets and good stuff
Delkevic 4-2 Exhaust – Put aftermarket exhaust from Delkevic on it
Brake Rebuild and Steel Braided Lines – Swapped the brake lines with steel braided, completely rebuilt the calipers and master cylinders
Shorty Levers – Got the cheap ebay ones
Integrated blinkers into stock tail light – I will try to find all the pictures and write up I did on this, but basically did an LED conversion for the brake, running, and blinkers, then put them all inside the stock tail light housing.
Star 650 Rear Shock – Got the rear shock off a newer Yamaha Star 650
Clip-On Handlebars – Got some new clip ons to give me a more forward lean when riding
Mostly Rebuilt/replaced fuel system – Cleaned, etched, and sealed the fuel tank, rebuilt the petcock, and replaced the fuel pump
Blinker Relay and Voltage Rectifier – Replaced both, and upgraded relay to handle LED
And Painted – Left a lot of the bike stock color, but did paint new plastics and tank to dark grey with white (vinyl, I ain’t got no patience for painting) striping.
What needs to be done
Upgrade the Lights – Going to redo the lights to a HID or LED, but completely replace the housing as well to ensure the light pattern is good. The replacement front fairing was designed for projectors, so will just continue down that route
Wire it all up – Will also need to rewire the gauges, lights, and front blinkers
Install new belly fairing – Bought an aftermarket one (Powerbronze) and will slap that on there
LED Blinker Mirrors – Got some new mirrors that have LED blinkers integrated with them
Put it all back together – Yeah, just need to put it all back together
Notes
I am pretty horrible at remembering to take pics, so you may not see much as I post on this project, but I for sure will have some of the final product.
I used a lot of the creativity from a lot of you on this forum and will try and remember to give credit where it is due, but if I do not, it is not personal, just me being a space cadet. So, here is also a broad thank you to everyone who has posted their projects. It has inspired me to do what I am and I am VERY grateful for it.
There is a better than good chance that once it is done, I will just rip it all apart again and just start all over.