(A post of mine I found on the old forums; by Drapheus)
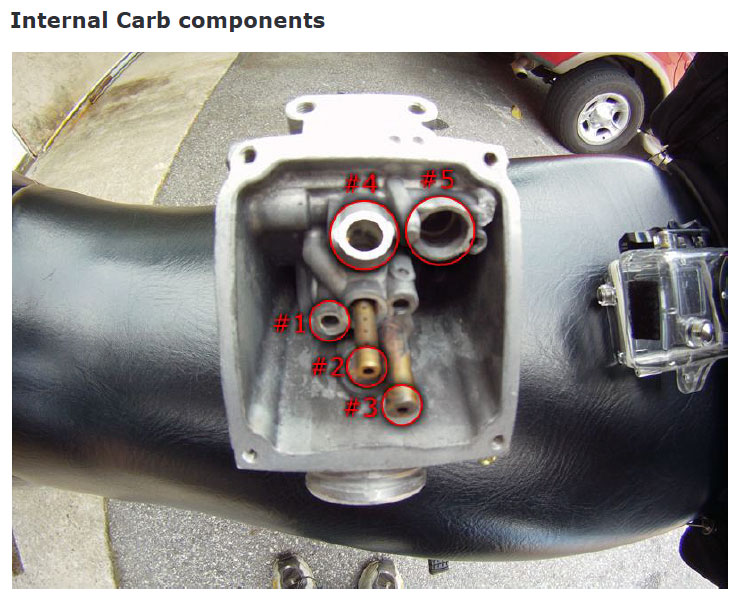
#1) It's the pilot jet (actual jet removed). That brass jet has a hole the size of a pin in there, and it gets clogged easily. The best way to clean it out is using a guitar string. Make sure that idle passage in the carb is cleaned out real well, and don't get carb cleaner in your eye like 98.4% of people do.
#2) Here's the main jet tube. Doesn't get gunked up often, but make sure all those little holes on the side are clean. Use the guitar string. In the picture, obviously the actual main jet and holder are removed. Use the guitar string on the actual jet as well. The little holes in the tube are what turn the gas into a quasi-mist, so it's more easily carried by the air.
#3) This is the enrichment circuitry jet, also falsely known as the choke. Open the choke and do your best to get some carb cleaner through there. Well honestly, as far as I know this is where the choke gets its gas. I haven't been able to verify that yet. But you squirt carb cleaner up there and it goes to the choke...so 2 + 2...
#4) The emulsion tube. Remove the brass bolt and washer from the top, and in a perfect world the tube should fall out towards the diaphragm. Make sure it's spotless and polished up. If it doesn't come out, you can tap it out with something that's not metal. You don't want to damage the threads on the top there (since brass is a very soft metal) or score the sides of the carb. Use something plastic to tap the tube out of there. Not metal. Plastic.
#5) The needle valve seat. Remove the Phillips head screw from the right of it, and use some pliers to pull the brass seat out. Don't manhandle it too hard with the pliers. Like I said, brass is soft, and you don't want to squeeze it and make the round hole not so round. Then your needle valve will get stuck. On the other end of the seat once you get it out there should be a wire mesh beanie on top which pops off. Pop that thing off and make sure there is nothing clogging the hole. The little beanie is supposed to keep rust and other particles out, but more often than not old gas and other buildup will clog the hole just underneath the beanie. If the O-ring around the brass seat looks like it's disintegrating, go ahead and replace it while you have it out.
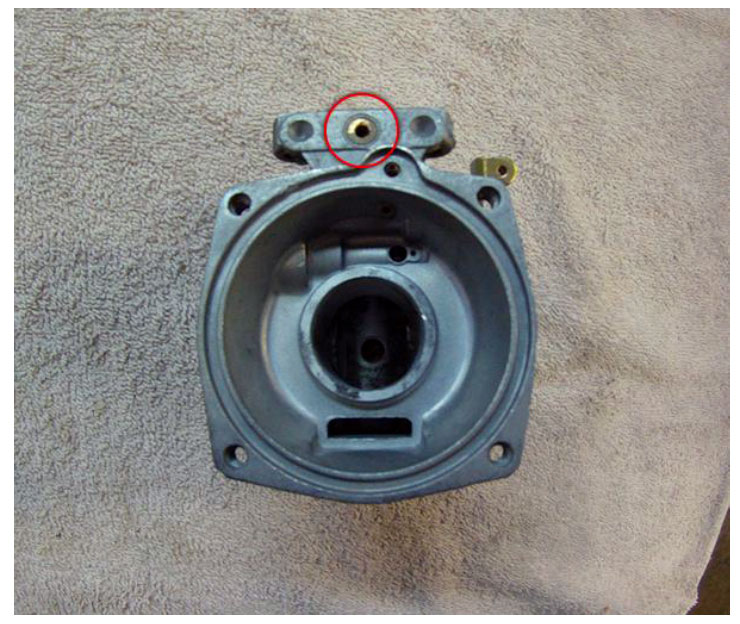
EPA plugs: Still have them? The one in the circle is in the process of getting drilled out, but you get the idea. The brass screw to adjust the carb's fuel mixture is in there. Normally you can get by without messing with it, but it's one more place gas can crystallize and clog your flow. If you're up to the task, you can carefully drill those out, remove the screw, and clean the passage. You'll have to go through the process of getting the fuel mixtures reset afterwards, but it's a small price to pay to get your bike running the best it can.
Downloadable/printable version of this article: http://www.xjrider.com/manual/internal_ ... eaning.pdf